As a reputable supplier of FJX Fittings, I understand that proper installation is crucial for the optimal performance and safety of these components. In this blog post, I will guide you through the step-by-step process of installing FJX Fittings, ensuring that you achieve a secure and leak-free connection every time.
Understanding FJX Fittings
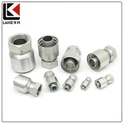
Before we delve into the installation process, let's take a moment to understand what FJX Fittings are and their applications. FJX Fittings are a type of high-quality hydraulic fittings that are widely used in various industries, including automotive, aerospace, manufacturing, and construction. These fittings are designed to connect hydraulic hoses, pipes, and other components, allowing for the efficient transfer of fluid power.
One of the key advantages of FJX Fittings is their versatility. They come in a variety of sizes, shapes, and configurations to suit different applications and requirements. Whether you need a straight fitting, elbow fitting, tee fitting, or a custom-designed fitting, there is an FJX Fitting available to meet your needs.


Another important feature of FJX Fittings is their durability. They are made from high-quality materials, such as stainless steel, carbon steel, and brass, which are resistant to corrosion, wear, and tear. This ensures that the fittings can withstand the harsh conditions of hydraulic systems and provide long-lasting performance.
Tools and Materials Required
Before you begin the installation process, it is important to gather all the necessary tools and materials. Here is a list of the tools and materials you will need:
- FJX Fittings: Make sure you have the correct type and size of FJX Fittings for your application. You can refer to the product specifications or consult with our technical support team if you are unsure.
- Hydraulic Hoses or Pipes: Ensure that the hoses or pipes are compatible with the FJX Fittings and have the correct diameter and length.
- Wrenches: You will need a set of wrenches to tighten the fittings securely. Make sure the wrenches are the correct size for the fittings.
- Sealant: Depending on the type of FJX Fittings and the application, you may need to use a sealant to prevent leaks. Choose a sealant that is compatible with the hydraulic fluid and the materials of the fittings.
- Cleaning Solvent: Use a cleaning solvent to clean the surfaces of the fittings and the hoses or pipes before installation. This will remove any dirt, debris, or contaminants that could affect the performance of the fittings.
- Safety Equipment: Wear safety glasses, gloves, and other appropriate safety equipment to protect yourself from any potential hazards during the installation process.
Step-by-Step Installation Process
Now that you have gathered all the necessary tools and materials, you can begin the installation process. Here is a step-by-step guide on how to install FJX Fittings:
Step 1: Prepare the Fittings and Hoses or Pipes
- Clean the surfaces of the FJX Fittings and the hoses or pipes using a cleaning solvent. Make sure to remove any dirt, debris, or contaminants from the surfaces.
- Inspect the fittings and the hoses or pipes for any damage or defects. If you notice any damage, replace the damaged components before proceeding with the installation.
- Apply a thin layer of sealant to the threads of the FJX Fittings if required. Make sure to follow the manufacturer's instructions for the application of the sealant.
Step 2: Connect the Fittings to the Hoses or Pipes
- Insert the end of the hose or pipe into the fitting until it reaches the bottom of the fitting. Make sure the hose or pipe is fully inserted and centered in the fitting.
- Use a wrench to tighten the fitting onto the hose or pipe. Start by hand-tightening the fitting, and then use the wrench to turn the fitting an additional 1/4 to 1/2 turn. Do not over-tighten the fitting, as this can damage the threads or cause the fitting to leak.
- Repeat the process for all the fittings and hoses or pipes that need to be connected.
Step 3: Check for Leaks
- Once all the fittings are installed, turn on the hydraulic system and check for any leaks. Look for any signs of fluid leakage around the fittings or the hoses or pipes.
- If you notice any leaks, turn off the hydraulic system and tighten the fittings further using a wrench. If the leak persists, you may need to replace the fitting or the sealant.
Step 4: Secure the Fittings
- After checking for leaks, use a locking device, such as a locknut or a safety wire, to secure the fittings in place. This will prevent the fittings from loosening or vibrating during operation.
- Make sure the locking device is installed correctly and tightened securely.
Step 5: Test the System
- Once the fittings are secured, turn on the hydraulic system and test it for proper operation. Check the pressure, flow rate, and temperature of the hydraulic fluid to ensure that the system is functioning correctly.
- If you notice any problems or abnormalities during the test, turn off the system and troubleshoot the issue. You may need to consult with our technical support team for further assistance.
Tips and Tricks
Here are some tips and tricks to help you install FJX Fittings correctly:
- Read the product instructions carefully before starting the installation process. This will ensure that you understand the installation requirements and procedures.
- Use the correct tools and materials for the installation. Using the wrong tools or materials can damage the fittings or cause leaks.
- Follow the manufacturer's recommendations for the torque specifications of the fittings. Over-tightening or under-tightening the fittings can lead to leaks or other problems.
- Make sure the surfaces of the fittings and the hoses or pipes are clean and free of debris before installation. This will ensure a proper seal and prevent leaks.
- Use a sealant that is compatible with the hydraulic fluid and the materials of the fittings. This will prevent leaks and ensure long-lasting performance.
- If you are unsure about any aspect of the installation process, consult with our technical support team. They can provide you with expert advice and guidance to help you install the fittings correctly.
Conclusion
Installing FJX Fittings correctly is essential for the optimal performance and safety of hydraulic systems. By following the step-by-step guide and tips and tricks outlined in this blog post, you can ensure that the fittings are installed securely and provide long-lasting performance.
If you have any questions or need further assistance with the installation of FJX Fittings, please do not hesitate to contact our technical support team. We are always here to help you with your hydraulic fitting needs.
If you are interested in purchasing FJX Fittings or other related products like High Pressure Hydraulic Fittings, Stainless Steel Fitting, or JIC Hydraulic Fittings, please feel free to reach out to us for a quote or to discuss your requirements. Our team of experts is ready to assist you in finding the right solutions for your hydraulic systems.
References
- Manufacturer's product specifications and installation guides for FJX Fittings.
- Industry standards and best practices for hydraulic fitting installation.